Setup

文章目录
Network
For hardware stuff, see Wireless
SSH
Key-Auth
ssh-keygen -t rsa
host {shortName}
    Hostname {address}
    Port 22
    User {username}
    IdentityFile {path/to/key}
do not forget to set private key 600
Win10-OpenSSH-Server
-
Install from Settings UI : Optional Features
-
Install from PowerShell :
Add-WindowsCapability -Online -Name OpenSSH.Server~~~~0.0.1.0 -
===Start-Service
Start-Service sshd
# OPTIONAL but recommended:
Set-Service -Name sshd -StartupType 'Automatic'
# then back to local machine:
ssh username@servername
Win32-OpenSSH
PS: Set-ExecutionPolicy RemoteSigned
or powershell -ExecutionPolicy Bypass -File .\install-sshd.ps1
SSH-Tunnel
http://wlwang41.github.io/content/ops/ssh%E9%9A%A7%E9%81%93%E4%BB%A3%E7%90%86.html
https://www.ibm.com/developerworks/cn/linux/l-cn-sshforward/
SSHFS
sshfs -C -o reconnect,ServerAliveInterval=15,ServerAliveCountMax=3 <server>:/path /path
Proxy
export http_proxy="http://localhost:1082/"
export https_proxy="http://localhost:1082/"
export ftp_proxy="http://localhost:1082/"
export socks_proxy="http://localhost:1080"
export no_proxy="127.0.0.1,localhost"
export ALL_proxy="socks5://127.0.0.1:1080"
apt: /etc/apt/apt.conf.d/12proxy
Acquire {
  HTTP::proxy "http://127.0.0.1:1082";
  HTTPS::proxy "socks5h://127.0.0.1:1080";
}
Git: git config --global http.proxy 127.0.0.1:1082
https://note.qidong.name/2020/05/docker-proxy/
Server
./ew -s ssocksd -l 1080
Client
tsocks: /etc/tsocks.conf
proxychains: /etc/proxychains.conf
iptables
iptables 设计非常灵活,不仅可以当防火墙,还可以进行端口转发,ip 分组过滤等等复杂的功能,甚至可以把它当成微型的编程语言,所以要先俯瞰 iptables 整体的操作逻辑
Table, Chain 和 Rule
最简单的说法就是 Table 由很多个 Chain 组成,而 Chain 由一些 Rule 串起来组成, 所以称之为”链“。
Rule 就是对于请求一个断言,如果请求满足断言就执行指定的操作(官方文档中称这个操作为目标,Target),举个例子,”如果请求来自 192.168.19.123,就将其拒绝“,这就是一个 Rule,而”拒绝“就是一个目标,常见的目标有接受,拒绝,转发,调用另一个 Chain 等等。
请求会在 Chain 中自上而下遍历,直到遇到一个匹配的 Rule,然后调用它的目标。
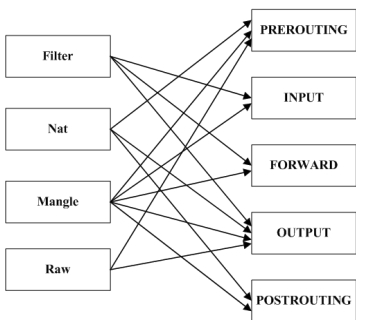
四表五链 iptables 中 Table 的数目是规定死的四个:
- filter: 过滤功能
- nat: 端口映射,地址映射等
- mangle: 用于对特定数据包的修改
- raw: 优先级最高的 Table
还有五个预定义的 Chain:
-
PREROUTING: 数据包进入路由表之前
-
INPUT: 通过路由表后目的地为本机
-
FORWARD: 通过路由表后,目的地不为本机
-
OUTPUT: 由本机产生,向外转发
-
POSTROUTIONG: 发送到网卡接口之前。如下图:
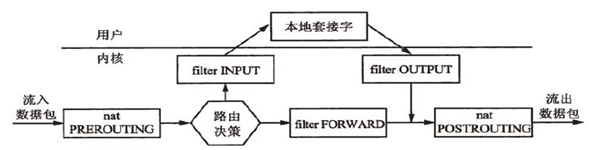
路由决策是指判断数据包的目的地是否是本机,如果是则进入 INPUT Chain,否则进入 FORWARD Chain
PREROUTING ,POSTROUTIONG 和 FORWARD 只有作为路由器使用时才会被调用,正常电脑就只会经过 INPUT 和 OUTPUT
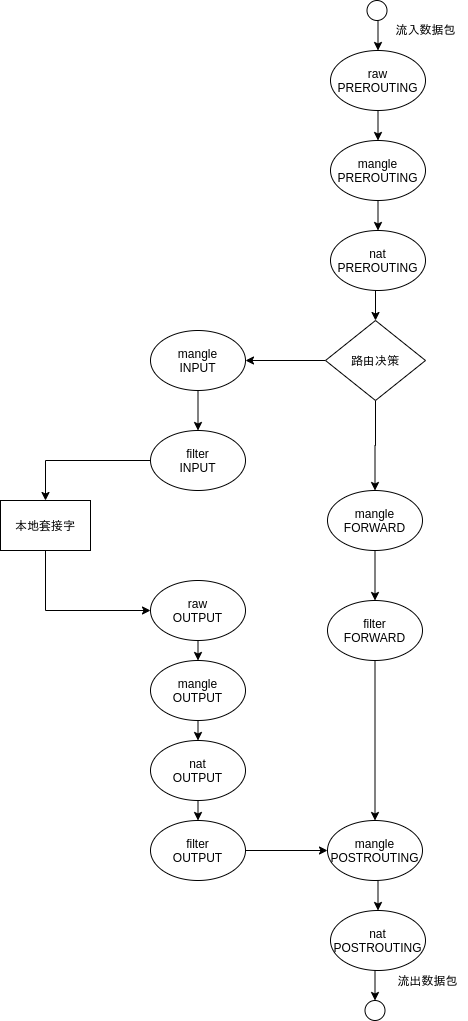
每个 Table 都含有几个预定义 Chain,优先级从高到低:raw > mangle > nat > filter
将内置的所有 Chain 串起来看就如下图:
目标
比如下面的命令:
iptables -A INPUT -p tcp --dport 80 -j ACCEPT
表示如果发现目标端口是 80 的 tcp 流量就放行,其中 -p tcp –dport 80 就是条件,而 ACCEPT 就称作目标(Target)了。
-A INPUT 表示将这条 Rule 追加到(Append)INPUT Chain 的最后面,这里没有指定 Table,默认就是 filter,也可以通过 -t 指定 Table。
常见的目标有:
- ACCEPT:接收数据包
- DROP:丢弃数据包
- REJECT:丢弃数据包并且返回一个拒绝
- REDIRECT:将数据包重定向到另一个端口
匹配条件除了上面两个,还有一些常用的:
- -s 匹配来源 ip
- –sport 匹配来源端口
- -m state 状态匹配,表示匹配数据包的状态,比如 -m state –state ESTABLISHED 就表示匹配已经建立了连接的数据包
RDP
HKEY_LOCAL_MACHINE\SYSTEM\CurrentControlSet\Control\Terminal Server\Wds\rdpwd\Tds\tcp
HKEY_LOCAL_MACHINE\System\CurrentControlSet\Control\Terminal Server\WinStations\RDP-Tcp
PortNumber then restart
(官方文档只列出第二处)
Aria2
Linux
Power
合盖的不同设定:
- poweroff 和 halt 均是关机(具体实现有区别)
- hybernate 是休眠,设备断电(同关机状态),内容保存在硬盘中
- hybrid-sleep 是混合睡眠,设备通电,内容保存在硬盘和内存中
- supspend (或 sleep)是挂起(睡眠),设备通电,内容保存在内存中
- lock 是锁屏
- kexec 是从当前正在运行的内核直接引导到一个新内核(多用于升级了内核的情况下)
- ignore 是忽略该动作,即不进行任何电源事件响应
BOOT
uncomment GRUB_DISABLE_OS_PROBER=false in /etc/default/grub
REISUB
- Add
GRUB_CMDLINE_LINUX_DEFAULTthesysrq_always_enabled=1variable in/etc/default/grubOR - Execute
echo kernel.sysrq=1 | sudo tee --append /etc/sysctl.d/99-sysctl.confAND - Execute
sudo update-gruborsudo grub-mkconfig -o /boot/grub/grub.cfg
Laptop: Fn+Alt+PrtSc
Once you’ve located your SysRq key, please keep the Alt key pressed.
Package Manager
pacman
speed up : XferCommand = /usr/bin/aria2c -x 8 -s 8 --dir $(dirname %o) -o $(basename %o) %u
-S -U -Q -R
pacman -Qoq /usr/lib/python3.9
yay
Arch 不可直接 pacman 装,clone yay-bin from AUR, makepkg -si
Terminal
Zsh
move to zinit
[[ -f ~/.private.zsh ]] &&s source ~/.private.zsh
Konsole
<c-(> <c-)> split
Yakuake
New Session <c-s-T>
Close Session <c-s-W>
Next Session <s-Right> ('
Tmux
set -g mouse on
setw -g mode-keys vi
KDE
Add Panel to the top, Global Menu added by default
Install widget Active Window Control to hide title bar for maximized windows
Install latte-dock to imitate OS X. Finally I chose to add widget Icons-Only Task Manager to the left of the panel.

balooctl disable
Settings -> Window Behavior -> Window Actions -> Inner Window 左手按键右手鼠标轻松操纵窗口
Fcitx5
<c-7> to remove word from history
<c-;> to show clipboard by default, having been reset to <c-'>
UNICODE: Ctrl+Alt+Shift+U
Scripts
insert \ at each EOL: sed -i 's/$/ \\/ FILENAME'
insert text at the beginning: sed -i '1i text' FILENAME
Windows
快速配置
wsreset -i 安装商店,商店中安装 winget 和 terminal
winget insall Git.Git
手装 VS Code
Set-ExecutionPolicy RemoteSigned -scope CurrentUser
irm https://raw.fastgit.org/scoopinstaller/install/master/install.ps1 | iex
scoop bucket add extras versions java retools
scoop install sudo dismplusplus
编辑 .ssh/config
Windows Terminal 加 Git Bash
            {
                "guid": "{00000000-0000-0000-ba54-000000000002}",
                "commandline": "%USERPROFILE%/scoop/apps/git/current/usr/bin/bash.exe -l -i",
                "icon": "%USERPROFILE%/scoop/apps/git/current/usr/share/git/git-for-windows.ico",
                "name" : "Git Bash",
                "startingDirectory" : "%USERPROFILE%"
            },
LTSC 2021 激活 注意别在官网下称评估试用版无法激活
民间下载地址 https://mirrors.lolinet.com/iso/windows/zh-cn_windows_10_enterprise_ltsc_2021_x64_dvd_033b7312.iso
Win7
only support Python3.8, does not support Docker
KB3063858 if fail to install Python
Development
Git
使用 ssh 代替 https进行 git 远程操作可以省去每次输入帐号的重复步骤,尽管一开始的密钥配置会略显繁琐。
ssh-keygen -t rsa -C "Whatever"
#输入文件名,按两次回车
#ssh-agent -s 无效,则用下面这条
eval $(ssh-agent -s)
ssh-add ~/.ssh/id_rsa
undo the first commit: git update-ref -d HEAD
clone from computers: git clone ssh://hostname/path/to/git
工作生活两不误之 includeIf 语法:
[includeIf "gitdir:/path/to/repo"]
    path = /path/to/.gitconfig-oss

[includeIf "gitdir:C:/work/"]
    path = /path/to/.gitconfig-work
Win 上 Git 问题总结:
- Load key invalid format: [https://stackoverflow.com/questions/41563973/git-clone-key-load-public-invalid-format-permission-denied-publickey]
Vim
fail to install YCM
quick comment
<c-V>to enter visual block mode- move around to select lines to comment
- press
<s-I>and insert#or// <Esc>then see changes
clipboard inconsistency
vim does not support Xorg, missing the +clipboard support. replace it with gvim
use "+y to copy to the system clipboard
to change the default behavior set clipboard=unnamedplus
resize window
<c-W> -/+上下 <>左右
encode
enc,fenc,fencs,tenc
-
enc(encoding) 内部使用的编码如buffer,寄存器中的字符串。在Vim打开文本后,如果它的编码方式与它的内部编码不一致,Vim会先把编码转换成内部编码,如果它用的编码中含有没法转换为内部编码的字符,那么这些字符就会丢失掉。默认值是系统的locale来决定。
-
fenc(fileencoding) 文件自身的编码从磁盘读文件时,Vim会对文件编码检查,如果文件的编码与Vim内部编码(enc)不同,Vim就会对文本做编码转换,将fenc设置为文件的编码。Vim写文件到磁盘时,如果enc与fenc不一样,Vim就做编码转换,转换成编码fenc保存文件。
-
fencs(fileencodings) 字符编码的列表编码的自动识别就是通过设置fencs实现的。当打开一个文件时,Vim会按照fencs中编码的顺序进行解码操作,如果匹配成功就用该编码来进行解码,并把这种编码设为fenc的值。这里的匹配成功指的是Vim能正确解码,不会出错,但是不保证没有乱码,所以fencs编码列表的顺序设置很关键。latin1是iso8859-1,属于国际化的标准编码,能表示任何字符,所以放到最后
-
tenc(termencoding) 终端使用文本编码,或者说是Vim用于屏幕显示时的编码,显示的时候Vim会把内部编码转换为屏幕编码再输出,也就是说我们从屏幕上看到的字符都是tenc编码的字符,如果为空,默认就是enc。windows平台Gvim会忽略掉tenc。一般就是从一个终端远程登陆到linux系统时候tenc会起作用。
VSCode
Window: Title Bar Style choose custom
Shortcuts
<c-B> toggle side bar
<c-J> toggle panel
<c-`>toggle integrated terminal
<c-K> leader key
<c-O>Open Folder<c-S>Keyboard Shortcut
vscodevim
set a shortcut to “Vim: Toggle Vim Mode”
- press
<c-K><c-S>, search for it - bind it to
Ctrl+'(the default shortcut of fcitx5 clipboard isCtrl+;)
press gcc to comment
files.exclude
-
Go to File -> Preferences -> Settings (or on Mac Code -> Preferences -> Settings)
-
Pick the
workspace settingstab -
Add this code to the
settings.jsonfile displayed on the right side:// Place your settings in this file to overwrite default and user settings. { "settings": { "files.exclude": { "**/.git": true, // this is a default value "**/.DS_Store": true, // this is a default value "**/node_modules": true, // this excludes all folders // named "node_modules" from // the explore tree // alternative version "node_modules": true // this excludes the folder // only from the root of // your workspace } } }
large workspace
cat /proc/sys/fs/inotify/max_user_watches
echo fs.inotify.max_user_watches=524288 >> /etc/sysctl.conf
ls /etc/sysctl.d/*-max_user_watches.conf
echo fs.inotify.max_user_watches=524288 | sudo tee /etc/sysctl.d/50-max_user_watches.conf && sudo sysctl --system
cat /proc/sys/fs/inotify/max_user_watches
CodeBlocks
Missing api-ms-win-crt-*.dll
Install VC++ 2015 Redistributable
Fail on Windows Server 2012
SQL
mysql -u {user} -p ENTER
postgres
\i 'path/name.sql' to load SQL script
\! <command> to run shell command
should disable CoW with chattr +C /var/lib/postgres on btrfs
Virtualize
boot VM from physical windows partition,即利用 VBoxManage 从(整个)物理磁盘创建 vmdk,注意 UEFI 启动。VMWare 会自动识别 vmdk 实际指向物理设备而报错,直接从物理磁盘创建即可。注意不要作死启动宿主机系统自身!
Docker
sudo groupadd docker sudo usermod -aG docker $USER
docker-compose on PM may be too old, use pip to install, then add $HOME/.local/bin to PATH
docker image/container prune [--filter=]
docker container rm $(docker ps -aq -f "since=删掉这个名字对应容器之后创建的所有容器")
容器有网络相关错误可能是net.ipv4.ip_forward=0 临时解决 run --network=host
K8S
一切皆 yaml
注意 --namespace
一般不直接 ssh node
kubectl port-forward pod-name LocalPort:RemotePort
libvirt
https://ostechnix.com/solved-cannot-access-storage-file-permission-denied-error-in-kvm-libvirt/
Hardware
Wireless
lspci, rfkill see if blocked
蓝牙耳机可配对但无法连接: 安装 pulseaudio-bluetooth(怎么 PA15 还不支持高级编码)pulseaudio-modules-bt(https://aur.archlinux.org/packages/pulseaudio-modules-bt/) 再重启 pulseaudio,或者直接上 pipewire
howdy
找摄像头路径,sudo howdy config 该配置
由于 kwallet 原因对 sddm 用处不大
kde, login, system-local-login 以在锁屏启用,必加 try_first_pass
su, sudo 不加 try_first_pass,因为在终端中可 C-c。单独 su 需要在 /usr/lib/security/howdy/models 下ln -s user.dat root.dat
linux-enable-ir-emitter 开红外,重启后失效的解决方法
File System
BtrFS
中文博客:https://qsdrqs.site/2021/01/ext4_to_btrfs/ 大概可从 ext4 无损转换,但 grub 等引导项配置需要避坑
- 改 fstab 中的 UUID 和 type
- 转换根目录,需要
mkinitcpio -P grub-intall和grub-mkconfig
新装也需注意,只划整个分区不创子卷意义不大,安装时没注意也可以弥补,只需 chroot 环境下挂载分区,于根目录创建 @name 子卷,再把原来位置的内容移进去,最后分区目录结构如下
/dev/nvme0n1p4
├── @
├── @cache  # /var/cache
├── @home
├── @log  # /var/log
├── @opt
├── timeshift-btrfs
└── @tmp  # /var/tmp
snapper 快照
LVM
pvs, pvcreate /dev/<foo>
vgs vgextend VG PV
lvs lvresize -l 100%FREE VG/LV
resize2fs VG/LV 别忘了文件系统扩容
NTFS
sudo mount -t ntfs-3g /dev/nvme0n1p4 /path/to/mount
NFS
CentOS 7安装配置NFS CentOS 7 下 yum 安装和配置 NFS
Server:
- create folder
- start servers
rpcbindnfs-server - edit
/etc/exportsexportfs -rshowmount -e
Client:
rpcbindmount [IP]:/ /path/to/mount
VHD
Ventoy 插件可启动 VHD 中的文件,虚拟机和U盘启动两不误
最简单的方法,在 VBox 创建磁盘格式为 VHD 的虚拟机再复制即可
MPICH
https://stackoverflow.com/questions/14769599/mpi-error-loading-shared-libraries
總結
delete file without rm shred -u unlink
问题记录
Ubuntu 16.04 to 18.04 断网
能 ping 固定 IP 但 ping 不通域名
edit /etc/systemd/resolved.conf, let DNS=8.8.8.8
systemctl restart systemd-resolved
DO NOT EDIT /etc/resolv.conf with 127.0.0.53 as a **stub resolver **!
KDE 桌面崩溃
kquitapp5 plasmashell
kstart5 plasmashell
killall ksmserver
触摸板突然失灵
sudo modprobe -r i2c_hid # 先卸载模块,或psmouse
sudo modprobe i2c_hid # 再装上模块
sudo systemctl daemon-reload #非必须
sytemctl suspend
VMWare报错
先检查是否装对应kernel版本的linux-headers
每次开机后再输sudo modprobe -a vmw_vmci vmmon
上述命令亦无效则是kernel版本太新尚无module可用,参见此贴中的步骤,下载该仓库中对应版本执行make即可编译完成
vmnet8 报错无法联网:sudo systemctl start vmware-networks.service
基于Qt的软件无法使用fcitx
qmake -query查看qt版本及路径等信息
评论正在加载中...如果评论较长时间无法加载,你可以 搜索对应的 issue 或者 新建一个 issue 。